Inserting Email Templates into Emails
[ 1 About D365 ] [ 2 Emails ] [ 3 Queues ] [ 4 Personalisation ]
This page outlines updates to the Insert Email Template Dialogue in D365. Outlining how business users can use the NEW email template interface, and provides guidance on how to display templates relevant to your team only.
Key Benefits
Users can utilise the Insert Email Template Dialogue to:
Switch between template views - provides different system views and custom views you’ve created
Toggle layouts - provides list, tile, or grid formats
Search functionality - filter by title, subject, description, or content
Record-based filtering - depending on "Recipient (To)" or "Regarding," it displays relevant templates
Template previews - before insertion
New System View: "My Team's Email Templates"
To assist users in locating only the templates relevant to their business team, a new system view has been created labelled My Team's Email Templates:
View Name: “My Team’s Email Templates”
This view is configured to filter templates to show only those created by or associated with your team, helping reduce clutter and simplify template selection.
Important Note:
- Due to Microsoft’s platform limitations, this view cannot be set as the default within the Enhanced Insert Template dialog. Users will need to manually select this view each time they open the dialog.
- All email templates are required to be created with an "Organization" visibility.
Steps to Follow:
Step 1 – Start composing an email within D365 (e.g., via the Timeline or Email form).
Step 2 – Click on Insert Template. The Enhanced Email Template dialog will open.
Refer to the numbered sections in the image above for guidance:
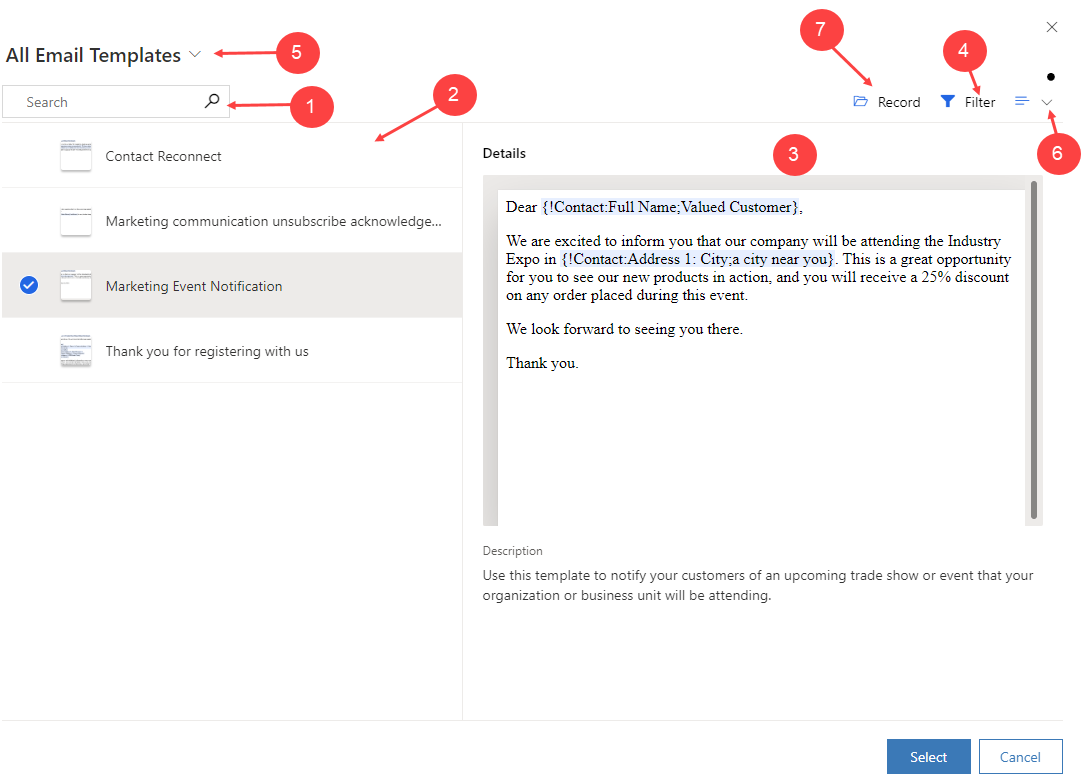
| Step Number | Feature | Description |
|---|---|---|
| 1 | Search Bar | Type to search templates by name, subject, or content keywords. |
| 2 | Template List Pane | Browse through available email templates. The selected template will show a preview on the right. |
| 3 | Template Preview | Shows a live preview of the selected template, including merge fields. |
| 4 | Filter Options | Filter templates by language, owner, or type (if configured). |
| 5 | View Selector | Click to open the dropdown and select "My Team's Email Templates" to view templates relevant to your team. |
| 6 | Display Settings | Toggle between List, Grid, or Tile views for your preferred layout. |
| 7 | Record Context | Select or change the "Regarding" or "To" record to filter templates contextually. |
Step 3 – From View drop down menu select “My Team’s Email Templates” from the list.
Step 4 – Click Preview to view the template content.
Step 5 – Click Insert to add the template to your email.
Out of Scope Features
The following capabilities are not included in the current update:
Restricting template access by business team or individual user:
At this time, all users have visibility to all organization-wide email templates. New System view - My Team's Email Template is created to filter the list in the Enhanced Insert Template dialogue. Fine-grained access control is not supported at this time.Automated email template ownership assignment:
Template ownership must be manually assigned to the appropriate team; otherwise, it will default to the individual user who created the email template.